1.1 Setting up and using the microscope
Introduction
A microscope is an optical instrument that uses a lens or a combination of lenses to produce magnified images of small objects, especially of objects too small to be seen by the unaided eye. The light microscope can be divided into six sub-categories. There are bright field, dark field, ultraviolet, fluorescence, phase contrast and differential interference contrast. The most common type of microscopy is the bright field microscopy.
The part of microscope
 | ||
| Light Microscope |
Functions:
Eyepiece Lens: the lens at the top that you look through. They are usually 10X or 15X power.
Tube: Connects the eyepiece to the objective lenses
Arm: Supports the tube and connects it to the base
Base: The bottom of the microscope, used for support
Illuminator: A steady light source (110 volts) used in place of a mirror. If your microscope has a mirror, it is used to reflect light from an external light source up through the bottom of the stage.
Stage: The flat platform where you place your slides. Stage clips hold the slides in place. If your microscope has a mechanical stage, you will be able to move the slide around by turning two knobs. One moves it left and right, the other moves it up and down.
Revolving Nosepiece or Turret: This is the part that holds two or more objective lenses and can be rotated to easily change power.
Objective Lenses: Usually you will find 3 or 4 objective lenses on a microscope. They almost always consist of 4X, 10X, 40X and 100X powers. When coupled with a 10X (most common) eyepiece lens, we get total magnifications of 40X (4X times 10X), 100X , 400X and 1000X. To have good resolution at 1000X, you will need a relatively sophisticated microscope with an Abbe condenser. The shortest lens is the lowest power, the longest one is the lens with the greatest power. Lenses are color coded and if built to DIN standards are interchangeable between microscopes. The high power objective lenses are retractable (i.e. 40XR). This means that if they hit a slide, the end of the lens will push in (spring loaded) thereby protecting the lens and the slide. All quality microscopes have achromatic, parcentered, parfocal lenses.
Rack Stop: This is an adjustment that determines how close the objective lens can get to the slide. It is set at the factory and keeps students from cranking the high power objective lens down into the slide and breaking things. You would only need to adjust this if you were using very thin slides and you weren't able to focus on the specimen at high power. (Tip: If you are using thin slides and can't focus, rather than adjust the rack stop, place a clear glass slide under the original slide to raise it a bit higher)
Condenser Lens: The purpose of the condenser lens is to focus the light onto the specimen. Condenser lenses are most useful at the highest powers (400X and above). Microscopes with in stage condenser lenses render a sharper image than those with no lens (at 400X). If your microscope has a maximum power of 400X, you will get the maximum benefit by using a condenser lenses rated at 0.65 NA or greater. 0.65 NA condenser lenses may be mounted in the stage and work quite well. A big advantage to a stage mounted lens is that there is one less focusing item to deal with. If you go to 1000X then you should have a focusable condenser lens with an N.A. of 1.25 or greater. Most 1000X microscopes use 1.25 Abbe condenser lens systems. The Abbe condenser lens can be moved up and down. It is set very close to the slide at 1000X and moved further away at the lower powers.
Diaphragm or Iris: Many microscopes have a rotating disk under the stage. This diaphragm has different sized holes and is used to vary the intensity and size of the cone of light that is projected upward into the slide. There is no set rule regarding which setting to use for a particular power. Rather, the setting is a function of the transparency of the specimen, the degree of contrast you desire and the particular objective lens in use.
Magnification and Resolution
Total Magnifications= Objective Lens Power × Eyepiece Lens Power
Objective Lens Power | Eyepiece Lens Power | Total Magnifications |
4x | 10x | 40x |
10x | 10x | 100x |
40x | 10x | 400x |
100x | 10x | 1000x |
The resolution of a microscope is taken as the ability to distinguish between two closely spaced objects and to reveal adjacent structural detail as distinct and separate. It is these impacts of diffraction that limit the ability to resolve fine details. Magnification is how much bigger a sample appears to be under the microscope than it is in real life. It is best to start out with the lowest magnification, get your specimen in focus, and then move up to the higher magnifications one at a time. This is the easiest way to ensure that you will be able to focus in on your object quickly. However, using a microscope with a more powerful magnification will not increase the resolution any further. It will increase the size of the image, but objects closer than 200nm will still only be seen as one point.
Objective
Learn the correct way to use a simple bright-field microscope.
Results
Bacillus

4x Magnification

10x Magnification

40x Magnification
Penicillium Conidia
 |
| 4x Magnification |
 |
| 10x Magnification |

40x Magnification
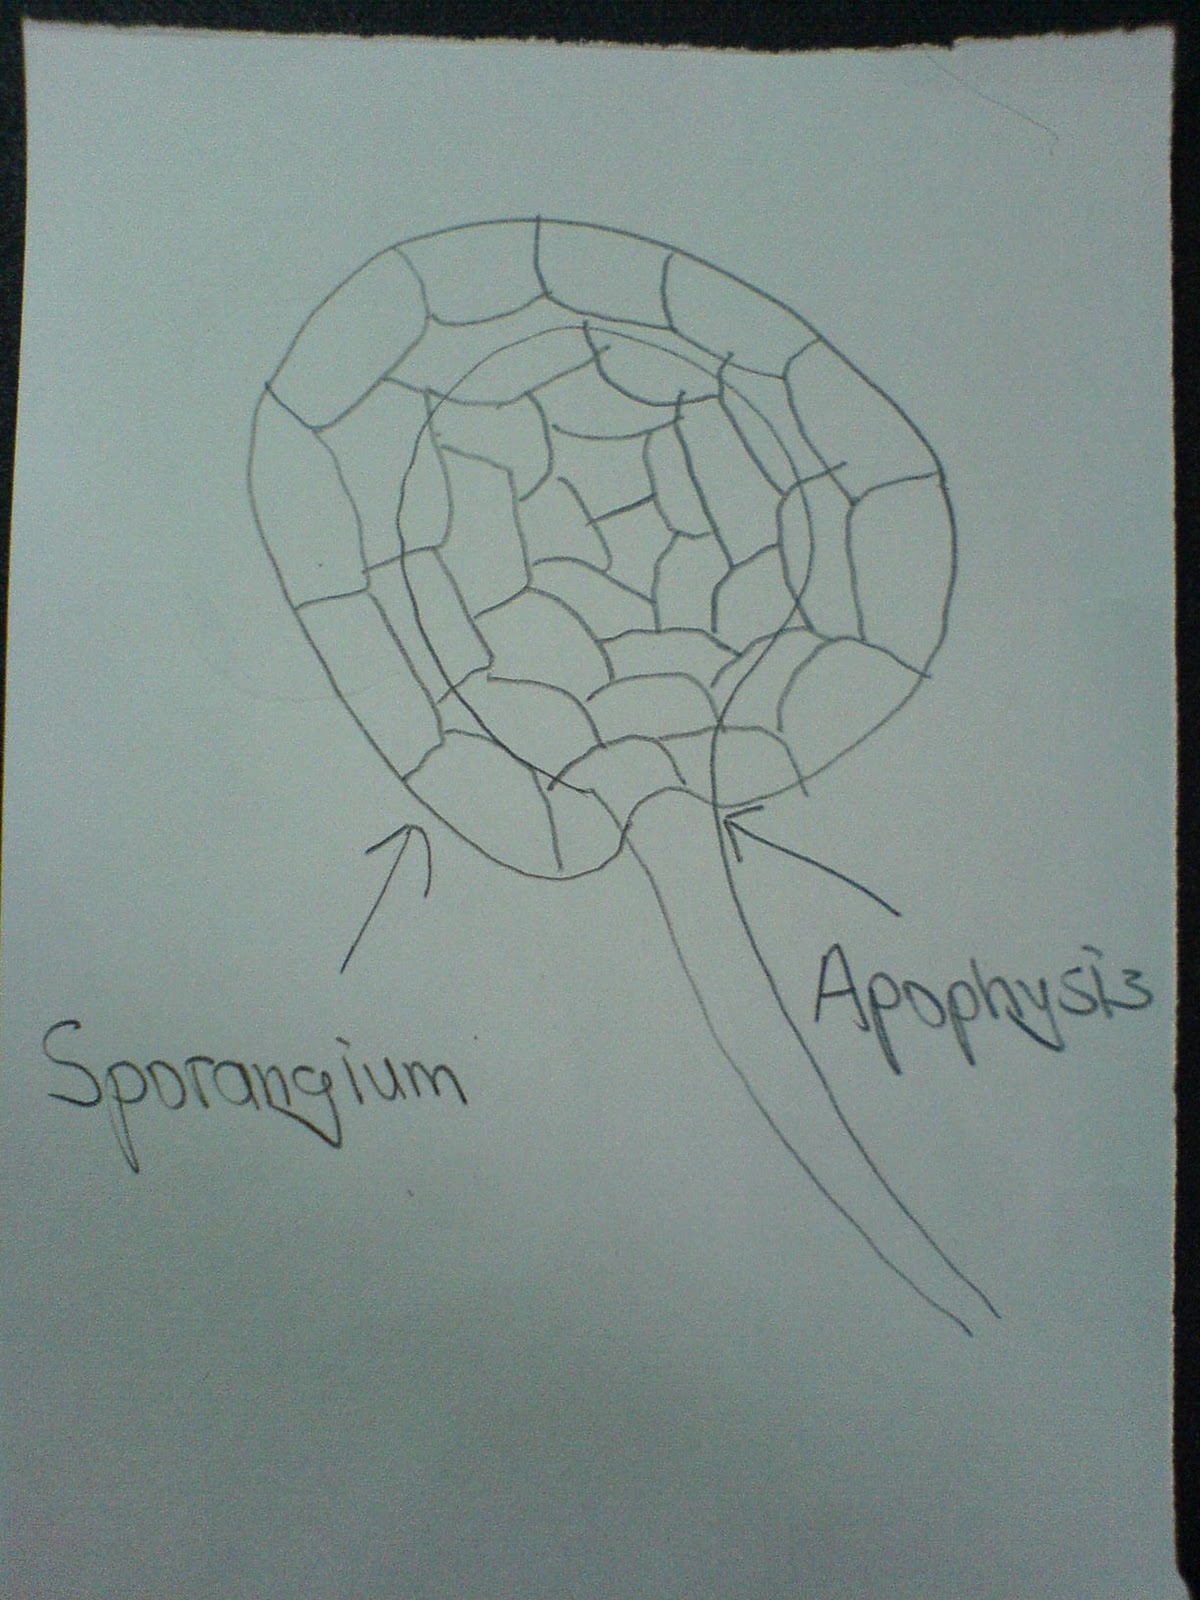
Rhizopus Sporangia

4x Magnification

10x Magnification
40x Magnification
* images of 100x magnification are not drawn because the images seen from the microscope are unclear. Often we could only see the colour of the dye.
Discussion
1. All specimens were observed using the lowest magnification which is 4x first, then follow by 10x, 40x and finally 100x. Under 100x magnification, oil immersion is used. This is because to improve the power of resolution and when light passes from a material of one refractive index to material of another, it bends. Light at different wavelengths bends at different angle and causes the magnified images to be less distinct. Oil immersion eliminates two refractive surfaces, so that the magnifications of 100x can be achieved while still preserving good resolution.
2. While observing the images, fine adjustment knob is used first followed by the coarse adjustment knob to ensure that the image is clear and focused at the centre.
3. Light intensity is adjusted to enable the correct amount of light enters the microscope and diaphragm is also adjusted to have a clearer view of the specimens.
4. The three microorganisms that were observed and drawn are Bacillus gram negative, Penicillium Conidia and Rhizopus Sporangia w.m B224.
5. These are the properties of the microorganisms that we observed:
a) Bacillus gram negative – rod shape bacteria
b) Penicillium Conidia – filamentous fungi, have branched conidiospores and is round in shape.
c.) Rhizopus Sporangia w.m B224 - pinhead-like structure and contains spores inside the cell.
6. The proper way to focus a microscope is to start with the lowest power objective lens first and while looking from the side, crank the lens down as close to the specimen as possible without touching it. Now, look through the eyepiece lens and focus upward only until the image is sharp. If you can't get it in focus, repeat the process again. Once the image is sharp with the low power lens, you should be able to simply click in the next power lens and do minor adjustments with the focus knob. If your microscope has a fine focus adjustment, turning it a bit should be all that's necessary. Continue with subsequent objective lenses and fine focus each time.
References
http://www.microscope-microscope.org/basic/microscope-parts.htm
http://www.websters-dictionary-online.com/definitions/rhizopus?cx=partner-pub-0939450753529744%3Av0qd01-tdlq&cof=FORID%3A9&ie=UTF-8&q=rhizopus&sa=Search#906
http://faculty.clintoncc.suny.edu/faculty/michael.gregory/files/bio%20102/bio%20102%20lectures/fungi/fungi.htm
http://www.websters-dictionary-online.com/definitions/rhizopus?cx=partner-pub-0939450753529744%3Av0qd01-tdlq&cof=FORID%3A9&ie=UTF-8&q=rhizopus&sa=Search#906
http://www.websters-dictionary-online.com/definitions/rhizopus?cx=partner-pub-0939450753529744%3Av0qd01-tdlq&cof=FORID%3A9&ie=UTF-8&q=rhizopus&sa=Search#906
http://faculty.clintoncc.suny.edu/faculty/michael.gregory/files/bio%20102/bio%20102%20lectures/fungi/fungi.htm
http://www.websters-dictionary-online.com/definitions/rhizopus?cx=partner-pub-0939450753529744%3Av0qd01-tdlq&cof=FORID%3A9&ie=UTF-8&q=rhizopus&sa=Search#906
1.2 Examination of cells
Introduction
Oil Immersion
Immersion oils are transparent oils that have specific optical and viscosity characteristics necessary for use in microscopy. An oil immersion objective is an objective lens specially designed to be used in this way. Many condensers also give optimal resolution when the condenser lens is immersed in oil. In light microscopy, oil immersion is a technique used to increase the resolution of a microscope. This is achieved by immersing both the objective lens and the specimen in a transparent oil of high refractive index, thereby increasing the numerical aperture of the objective lens.
 |
| Oil Immersion Microscope Objective |
Wet mount
A wet-mount is when someone prepares a sample to be viewed on a microscope. Usually a person will place the bacteria (dissolved into water or broth) onto a microscope slide. Then they place another thin piece of glass over the slide. The purpose of a wet mount is to protect the microscope lens from the specimen and to provide an even surface for viewing. Additionally, further degradation of the specimen is avoided.
Objective
 |
| Wet Mount procedures |
Objective
· To expose students to the use of microscope
· Provide chances for students to observe the shape and size of living microorganisms
· Provide an experience in the use of immersion oil
Procedure
a) Stained cell:
Refer to lab manual page 11
b) The wet mount:
Refer to lab manual page 11
Results


DiscussionsLactobacillus

4x Magnification

10x Magnification

40x Magnification

100x Magnification
Lactobacillus (genus Lactobacillus), any of a group of rod-shaped, gram-positive, non-spore-forming bacteria of the family Lactobacillaceae. Similar to other genera in the family, Lactobacillus are characterized by their ability to produLactobacillus (genus Lactobacillus), any of a group of rod-shaped, gram-positive, non-spore-forming bacteria of the family Lactobacillaceae. Similar to other genera in the family, Lactobacillus are characterized by their ability to produce lactic acid as a by-product of glucose metabolism. The organisms are widely distributed in animal feeds, silage, manure, and milk and milk products. Various species of Lactobacillus are used commercially during the production of sour milks, cheeses, and yogurt, and they have an important role in the manufacture of fermented vegetables (pickles and sauerkraut), beverages (wine and juices), sourdough breads, and some sausages.
Lactobacillus are generally nonmotile and can survive in both aerobic and anaerobic environments. L. delbrueckii, the type species of the genus, is 0.5 to 0.8 micrometre (μm; 1 μm = 10−6 metre) across by 2 to 9 μm long and occurs singly or in small chains. Examples of other well-characterized Lactobacillus species include L. acidophilus, L. brevis, L. casei, and L. sanfranciscensis.
The amount of lactic acid produced by different Lactobacillus organisms varies. In several species, including L. acidophilus, L. casei, and L. plantarum, glucose metabolism is described as homofermentative, since lactic acid is the primary byproduct, representing at least 85 percent of end metabolic products. However, in other species, such as L. brevis and L. fermentum, glucose metabolism is heterofermentative, with lactic acid making up about 50 percent of metabolic byproducts and ethanol, acetic acid, and carbon dioxide making up most of the other 50 percent. Certain other heterofermentative Lactobacillus organisms are relatively inefficient in their metabolism of glucose and must derive energy from other types of organic compounds, such asgalactose, malate, or fructose.
Conclusion
The higher the power of microscope magnification can view more clearly the details of microorganisms.
The higher the power of microscope magnification can view more clearly the details of microorganisms.
http://www.britannica.com/EBchecked/topic/327373/Lactobacillus
http://www.savetheantibiotic.com/public_html/0_Educators/popups/lactobacillusPop.html
http://www.raw-milk-facts.com/raw_milk_safety.html
http://archive.microbelibrary.org/ASMOnly/Details.asp?ID=1471
http://www.savetheantibiotic.com/public_html/0_Educators/popups/lactobacillusPop.html
http://www.raw-milk-facts.com/raw_milk_safety.html
http://archive.microbelibrary.org/ASMOnly/Details.asp?ID=1471
xcv